Content
Technician Checklist:
- Add user to Remote Desktop Users Group on University system.
- Hostname or IP
User Checklist:
You must setup DUO and VPN before you can set up a remote connection.
- Enroll in DUO (use method other than office phone).
- Download and Install VPN
- Setup Remote Desktop Connection (PC to PC)
- Setup Remote Desktop Connection (Mac to PC)
- Setup Remote Desktop Connection (Mac to Mac)
- UNL – directions to Call Forward your Phone
Duo Two-Factor Authentication (TFA) Enrollment Guide
Duo’s self-enrollment process makes it easy to register your phone and install the Duo Mobile application on your smartphone or tablet.
1.Enroll in Duo TFA using TrueYou
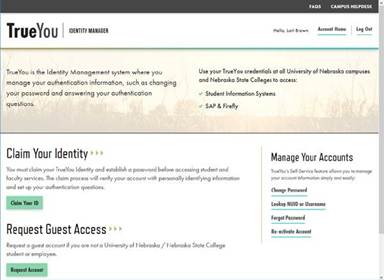
Go to TrueYou and click your campus identity. Click Manage TrueYou Duo Two-Factor Devices. Sign on.
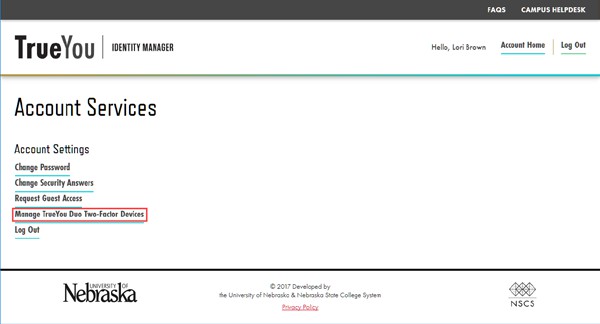
Click Manage TrueYou Duo Two-Factor Devices.
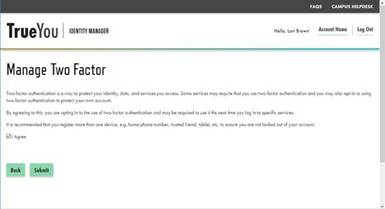
Check the "I Agree" box and click "Submit". By checking the box, you are agreeing to that fact that you will be required to use Duo for certain campus services.
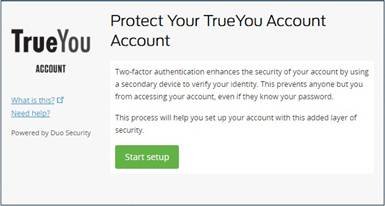
2. Duo TFA Setup Screen
You will then see the Duo TFA setup screen. Click "Start Setup" to begin enrolling your device.
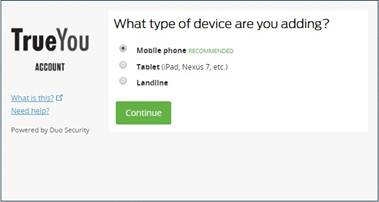
3. Choose the Type of Device You're Enrolling
Select the type of device you’d like to enroll and click "Continue". It is recommended to use a smartphone for the best experience, but you can also enroll a landline telephone or iOS/Android tablet.
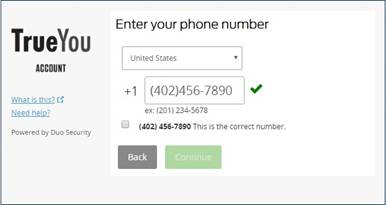
4. Type Your Phone Number
Select your country from the drop-down list and type your phone number. Use the number of your smartphone, landline or cell phone that you’ll have with you when you’re logging in to a Duo-protected service. You can enter an extension if you chose “Landline” in the previous step. If you’re enrolling a tablet, you will not be prompted to enter a phone number.
Double-check that you entered it correctly, check the box, and click "Continue" .
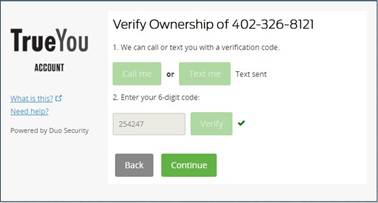
5. Verify Ownership of Number
Choose to have Duo "Call Me" or "Text Me" at the number you entered. If you chose to receive a text, enter the code in the field and click "Verify". Once it has been verified, click "Continue".
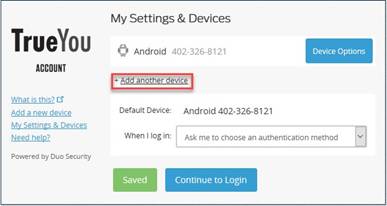
6. Link your Phone Number to a Device and/or Add Another Device (recommended)
If you want to use your phone for push notifications, click Add another device.
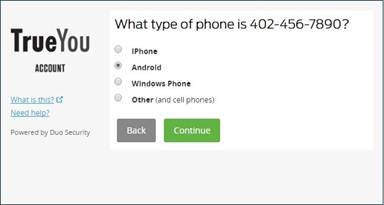
7. Choose Your Device Platform
Choose your device’s operating system and click "Continue".
8. Install Duo Mobile
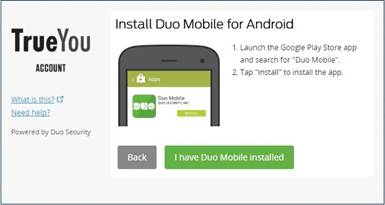
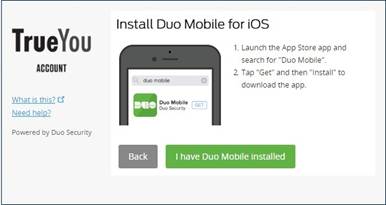
Duo Mobile is an app that runs on your smartphone or tablet and helps you authenticate quickly and easily.
Follow the platform-specific instructions on the screen to install Duo Mobile. After installing Duo, return to the enrollment window and click "I have Duo Mobile Installed".
Android:
iPhone:
9. Activate Duo Mobile
Activating the app links it to your account so you can use it for authentication. Open Duo on your smartphone or tablet.
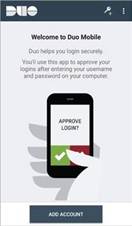
Press "Add Account", or press the "Key+" icon.
Hold your phone up to the screen so it can scan the barcode.
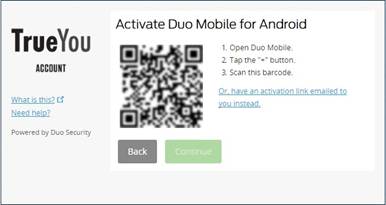
When you have successfully scanned the barcode, a check mark will appear and you can click "Continue".
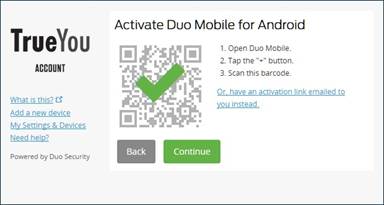
Can't scan the barcode? Click "Or, have the activation link emailed to you instead." and follow the instructions.
10. Configure Automatic Device Options (Optional)
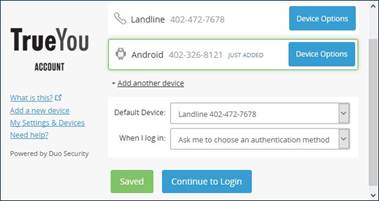
Add another device – Click "Add Another Device" to start the enrollment process again and add a second phone or device. Note: It is recommended that you register at least two devices, for 6 example, both your smartphone and your office phone. If your smartphone is unavailable, you will still be able to access protected systems using your secondary device.
Rename your device - Click "Device Options" to give your device a more descriptive name.
Delete a device – Click "Device Options" and click the "Trash Can" icon beside the device you wish to delete.
Setting a Default device - If this is the device that you’ll use most often with Duo, then you will want to choose it as your Default Device.
Automatic Notification Settings - You may also want to change the “When I log in:” option to either “Automatically send this device a Duo push” (smartphones only) or “Automatically call this device” so you are not prompted each time to choose an authentication method.
Click "Continue to Login" to proceed to the authentication prompt.
Congratulations!
Your device is ready to approve Duo authentication requests. Click "Send Me a Push" to give it a try (with the Duo mobile app).
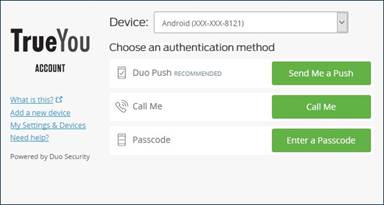
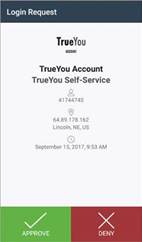
On your phone, you should get a notification that you have a Login Request. All you need to do is tap “Approve” and you should now be logged into your application.
How to Configure Cisco VPN on a Mac or Windows Computer
These are instructions on how to configure Cisco VPN on a Mac or Windows computer so you can access specific campus resources from off-site.
These instructions will only work if you’re connected the internet.
Prior to VPN configuration:
Before you connect to the NU VPN, you must be enrolled in TrueYou Duo.
Duo provides two-factor authentication, which is a second layer of security to your online accounts. Verifying your identity using a second factor (like your phone or other mobile device) prevents anyone but you from logging in, even if they know your password. To register with TrueYou Duo use these instructions or visit the Duo support page for videos and additional help topics.
VPN Installers:
- Linux Quick Start Guide
- Windows Quick Start Guide
- Mac Quick Start Guide
Connecting to the NU VPN:
The guides above provide greater detail, but in general, here is the information for connecting. Please refer to the guides for more specific details.
1. Browse to nu-vpn.nebraska.edu
2. Fill in your TrueYou Credentials (8-digit NUID and password).
3. If your credentials don't work, please reset your password via TrueYou.
4. A page will load giving you the option to download the VPN software by clicking on “GlobalProtect Agent” at the top-right of the screen.
5. From that link, choose the version of software needed for your device and install the client.
6. After install, open the GlobalProtect App from where it was installed.
7. Enter the portal address of nu-vpn.nebraska.edu(Please note that this is different than the previous VPN portal address)
8. Click the connect button (Please note that in some cases we have found that setting your default browser to Chrome helps with initial login issues)
9. When prompted, sign in with your NUID and password (You should then be prompted for DUO 2- factor by whatever method you have chosen).
10.Once connected, you should see the GlobalProtect icon in the Taskbar with a small shield icon indicating the connection.
11.To view your VPN settings, click the icon in the Taskbar, and then find the settings menu by clicking on the three horizontal lines in the upper right. From there, you can view tabs that show your connection details.
Remote Desktop Connection for Windows PCs
Please read through the instructions completely one time before attempting these steps. You must first connect the VPN before following these steps.
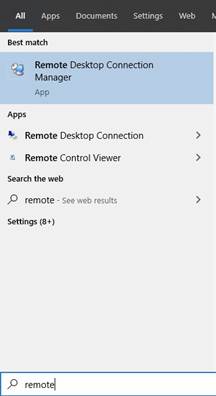
To access Remote Desktop Client, Click the start button and start typing the word Remote. Select Remote Desktop Connection from the search results to open the program.
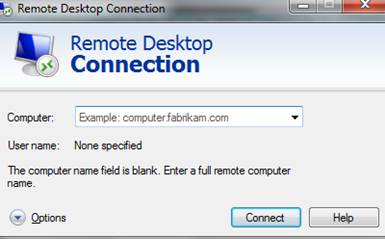
Type the Hostname or IP address provided by your support tech in the Computer field of the Remote Desktop Connection program and click the "Connect" button.
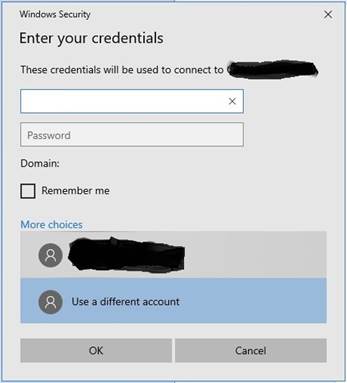
When prompted for your username and your password, select "More choices", then Use a different account. Type your Canvas username, including @unl.edu after, and your Canvas Password (ex. hhusker2@unl.edu)
If prompted with a certificate warning about the remote computer identity, you can select "Don’t ask me again for connections to this computer", and click the "Yes" button.
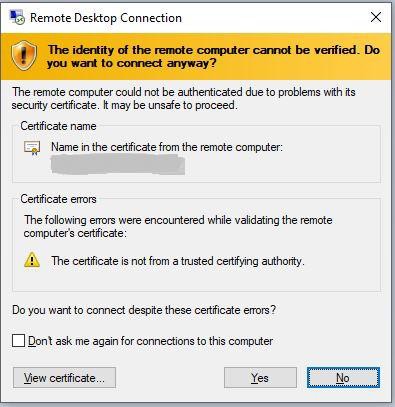
You should now see your office desktop and any open programs and files running on it, as well as be able to access any other University resources.
When you are finished working remotely, remember to disconnect your remote session, by clicking the "X" circled in the screenshot below. If the remote connection bar is not visible at the top of your screen, move the mouse all the way to the top center of your screen and it should appear.
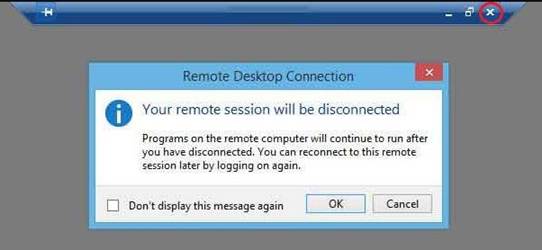
Also remember to disconnect from the VPN connection, by clicking the "Global Protect" icon and clicking the "Disconnect" button.
Remote Desktop Connection for Mac connecting to PC
Installation
If the machine is enrolled in JAMF...
- Open the Self Service application from your applications folder
- Log into the application using your My.UNL credentials
- Search for Microsoft Remote Desktop 10
- Click the “Install” button for Microsoft Remote Desktop 10 and allow application to install.
- Open Microsoft Remote Desktop
If the machine is not enrolled in JAMF...
- Open the App Store
- Search for Microsoft Remote Desktop 10
- Install Microsoft Remote Desktop and open the application
Add a PC Connection to Microsoft Remote Desktop 10
1. Click the “+” icon at the top of the window and select “Add PC”.
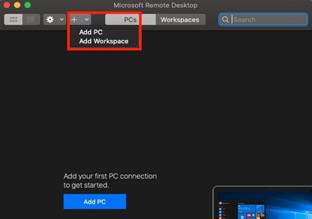
2. Enter the PC name into the PC name field. This will be the IP address or the hostname of the PC you would like to remotely access and click “Add” to save the connection.
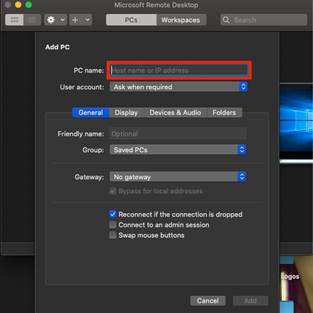
3. Double click the connection that you have just created.
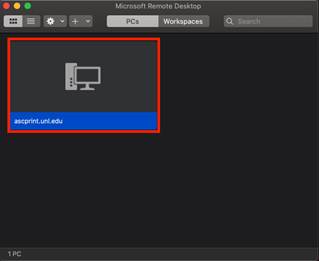
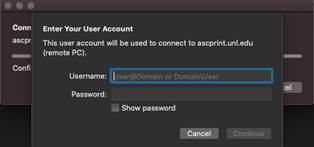
4. Enter your login credentials for the PC that you are trying to log into.
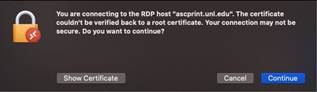
5. Click "Continue" when prompted when asked if you want to continue with the connection.
6. You will be remotely connected to the PC and will be able to use it as if you were there in person.
VNC for remotely connecting from a Mac to a Mac
Enable Remote Login and Remote Management on the Mac that you need to connect to.
1. Open up your System Preferences > Sharing > select "Remote Login" and "Remote Management".
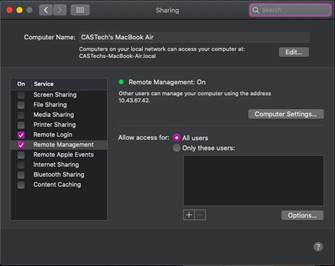
2. Select the Remote Management service and click the “options” button and select all of the control options.
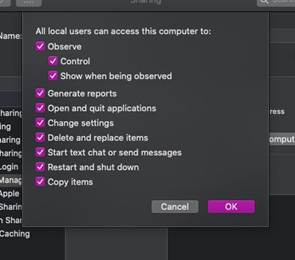
Click "OK" when done.
Set up the VNC Connection on your Mac
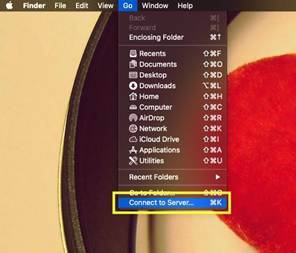
1. Click a blank space on your desktop to get the Finder menu. Click Go > Connect to Server.
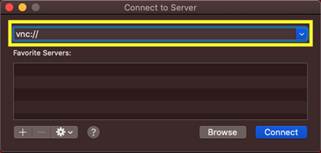
2. Enter vnc:// and the IP address or hostname for the Mac you would like to connect with.
3. Log in with your normal computer login credentials
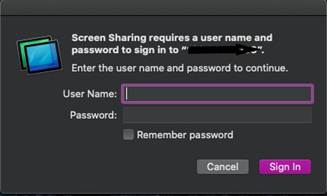
4. You’ll then be connected to the Mac and will be able to control the computer.
Directions to Call forward your Phone
Issues should be directed to the campus Helpdesk at support@nebraska.edu or 472-3970.
Centrex Analog Phone users:
From the Centrex Analog Phone set that does not have a button labeled Call Forwarding
To call forward a Centrex line without a call-forward button. Lift the handpiece on your set and press *72. When you hear a dial tone, type in the number you want to forward to. You will hear a couple of tones to let you know your phone is now forwarded.
- 2-XXXX for ON CAMPUS
- 9 + for a number OFF CAMPUS,
- 9+1+ for OFF CAMPUS LONG DISTANCE
To remove the forwarding, pick up the handpiece on our set and press #72.
From a Centrex Phone that has a “Call Forward” button on the phone
Press the Call Forward button and wait for a second dial tone When you hear a dial tone, type in the number you want to forward to.
- 2-XXXX for ON CAMPUS
- 9 + for a number OFF CAMPUS,
- 9+1+ for OFF CAMPUS LONG DISTANCE
Press the Call Forward button again and you will see an arrow in the window. That indicates your phone is now forwarded.
To remove the forwarding, press the Call Forward button again, the arrow will disappear, and the forwarding is now off.
Note: Centrex analog Call Forwarding can only be turned on / off from the Centrex Phone set before you leave. It cannot be done remotely. You must be at your Centrex desk phone.
Cisco Phone users:
From the Cisco Phone set:
Press the black button on your phone below the display screen that has the three dots above it
Press black button on the row just below the display screen, that is under the display screen position that shows “Fwd All “
Type in the phone number you wish to forward your calls to following the same protocol as you would on a Centrex line
- 2-XXXX for ON CAMPUS
- 9 + area code + xxx-xxxx for off CAMPUS LOCAL #
- 9+1+ area code + xxx-xxxx for off campus local # OFF CAMPUS LONG DISTANCE)
To turn-off the Call Forward:
- Press the black button on your phone below the display screen that has the three dots above it.
- Press black button on your phone below the display screen that shows “Fwd Off”.
From the Cisco Self Service Portal
its.unl.edu/services/phone-service/VOIP/ or phone.unl.edu
Click on “Self-Care Portal” button to sign in.
After clicking on link your campus credentials will be required (same credentials that you when you sign into your computer (username……. & Password….) hit enter and then you will have to authenticate via DUO
If you have not signed into the Cisco Self-Care portal before, you must reset your PIN # (usually a minimum of 4 numbers – no letters)
A screen will appear that shows all your Cisco VoIP devices ( phone set and/or soft phone etc.)
- Click on the Cisco device you want to turn on Call Forwarding to
- Click on “settings”
- Click on “Call Forwarding” button in top left of screen
- Click the small empty box to insert a check mark
A drop-down screen will appear to:
- Call Forward to “Voicemail”
- “Add a new number”
Type in phone # as you would dial it from your desk ( but do not include any hyphens….just type the numbers)
- 4-XXXX for ON CAMPUS
- 9 + area code + xxx-xxxx for off CAMPUS LOCAL #
- 9+1+ area code + xxx-xxxx for off campus local # OFF CAMPUS LONG DISTANCE)
Click on “save” changes
To turn-off the Call Forward repeat steps above, but when you get to Click on “Call Forwarding” button in top left of screen:
- Click small empty box to “uncheck” the box
- Click “save changes” and Call Forward field will be blank indicating Call Forwarding is turned off”
From the Cisco Jabber Soft Phone (to download the Cisco Jabber Soft Phone software on your computer)
- Click on the “Download” button ( either for Windows computers or MAC)
To turn-on Call Forwarding
- Sign into your Jabber soft phone from your computer
- Bottom left hand corner click on drop down arrow
- Click on “Forward Calls to": “Voicemail” or “Add a new number”
Type in phone # as you would dial it from your desk ( but do not include any hyphens….just the numbers)
- 4-XXXX for ON CAMPUS
- 9 + area code + xxx-xxxx for off CAMPUS LOCAL #
- 9+1+ area code + xxx-xxxx for off campus local # OFF CAMPUS LONG DISTANCE)
Click on “save” changes
To turn-off the Call Forward repeat steps above, but when you get to Click on “Call Forwarding” button in top left of screen